On this page
Requests and team
Messages from visitors reach you through the contact form on your website. XICflow collects them under “Requests”, sends you an email if you want one and lets you record how far you have got. Under “Team” you invite colleagues and decide what they are allowed to do.
Where requests come from
Every request starts with a form on your website. Two blocks provide one.
In the editor you either add the “Contact form” block, which already comes with name, email, phone and message, or the “Form” block, where you assemble the fields yourself. Both send what visitors enter to XICflow, where it appears under “Requests”.
Name, email and message are mandatory and marked with an asterisk; the phone number is optional. Below the send button there is a note about processing the details, with a link to your privacy policy. Once the request has arrived, the block replaces the form with the confirmation “Message sent successfully.” and the line “We typically respond within one business day.” If it does not work, “Error sending message. Please try again.” appears and the entries stay in place.
With the “Form” block you set the label and the field type yourself and decide which fields are mandatory. Extra fields later show up in the request under their own label, and in a separate column of the export.
Arrange a callback
Example of a form you assemble yourself, with your own fields.
Which field types exist
You can choose single-line text, email, phone, number, dropdown, multi-line text, checkbox and consent. A dropdown first shows your placeholder, for instance “Please choose”, and below it the answers you defined. Checkboxes and consent fields appear in the request as “Ja” or “Nein”.
XICflow also maps your fields to the fixed columns of a request automatically: the email field becomes the email address, the phone field the phone number, the first multi-line field the message, a field with “Name” in its label the name, and a field containing “URL”, “Website” or “Webseite” the address. It is therefore worth labelling the fields clearly — the email address and phone number then appear as clickable links in the list.
Fields left empty are not transmitted. A form can hold up to 40 custom fields; a message is truncated after 5,000 characters, a single custom field after 2,000.
Only a published website accepts requests
As long as the page only exists in the preview, nothing arrives. So publish again after adding a form. Simple bot entries are filtered out automatically and never reach the list.
Spam protection: what never arrives
So that your inbox does not fill up with bot messages, XICflow checks every submission. Entries that are filtered out are not stored.
- Every form contains an invisible field that only a program fills in. If it is filled, the submission is discarded.
- Anyone submitting sooner than three seconds after the page loads is ignored as well — nobody types that fast.
- The email address has to be valid, and at least one further field (name, message, address or a custom field) has to be filled in.
- If the name or message contains two or more web addresses or typical advertising terms, the entry counts as spam.
- From the same internet address XICflow accepts at most ten submissions per minute.
Your test request always looks successful
So that bots receive no feedback about their success, the form shows the confirmation even when the entry was filtered out or the website is not published yet. Test with real details, without links in the message, and then check the list under “Requests”.
Viewing and handling requests
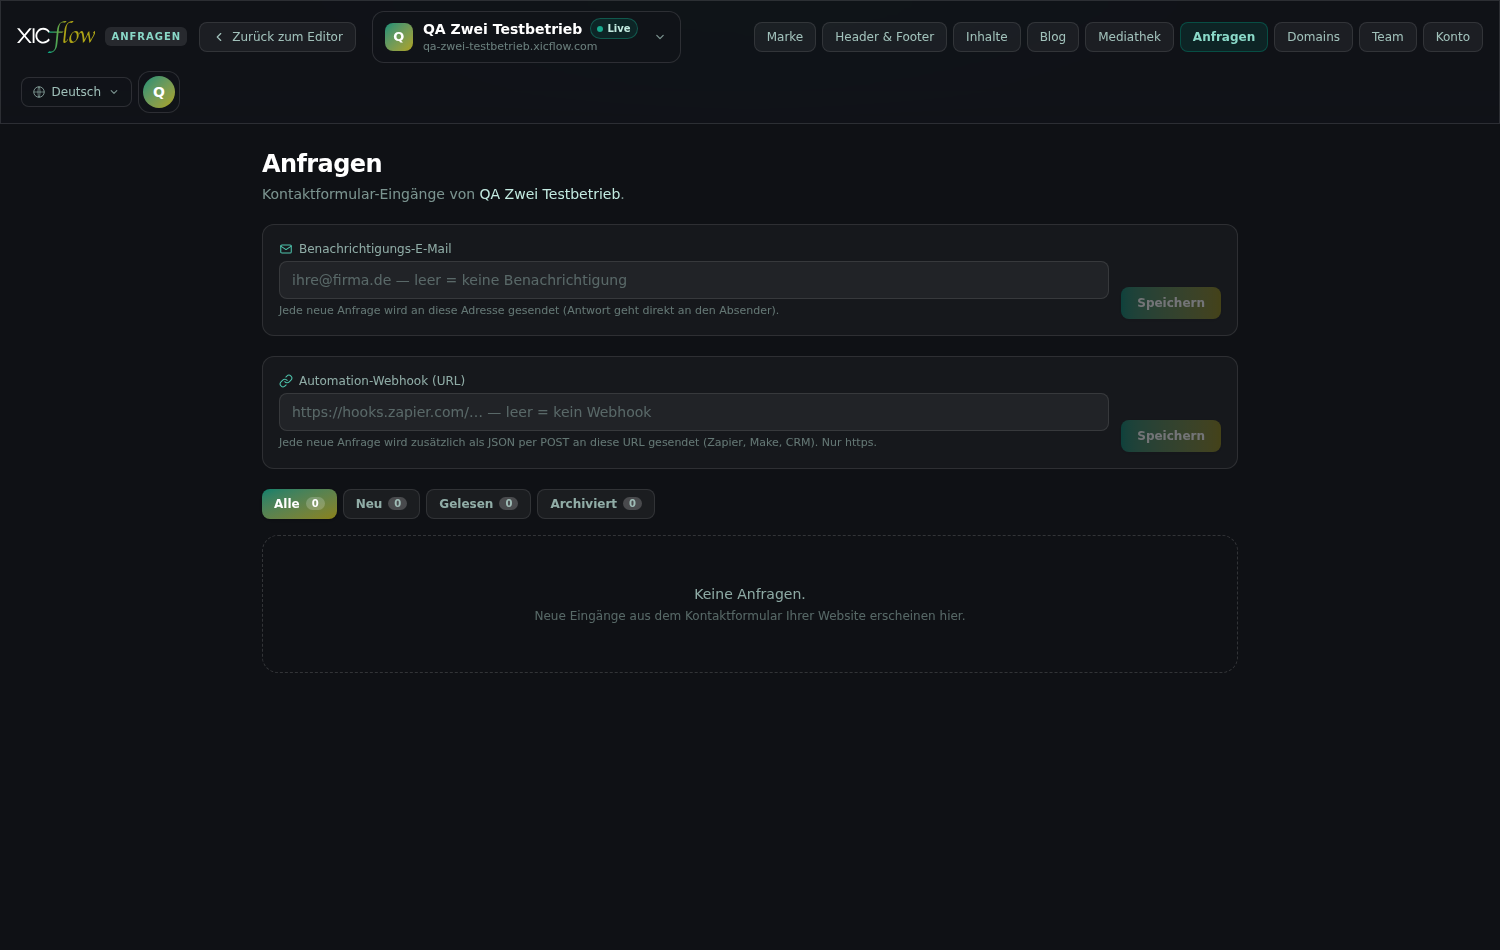
The “Requests” tab collects the submissions per website and records what you have already worked through.
-
Click the “Requests” tab in the top bar.
-
Choose the website whose submissions you want to see, at the top left.
The default is your first published website, because that is where real requests arrive. Above the list you find “Contact form submissions from …”. If you have no website yet, the note “No website yet.” appears instead.
-
Filter the list with the buttons “All”, “New”, “Read” and “Archived”.
The number next to each button shows how many entries belong to it; for screen readers the bar is named “Status filter”. If there is nothing to see yet, it reads “No requests” — with a filter set, followed by “in this status” — and below it “New submissions from your website contact form appear here.”
-
Read the entry with name, date received, email address, phone number and message.
Extra fields from a self-built form follow underneath, together with the line “Form:” naming the form. If nobody entered a name, the entry reads “No name”.
-
Reply straight away: clicking the email address opens your mail program, clicking the phone number starts a call.
The actions sit on the right of each entry:
- “Mark as read” — the entry loses its highlight.
- “Mark as new” — puts an entry you already read back to new.
- “Archive” — takes the entry out of your day-to-day view without deleting it.
- “Delete” — removes the entry for good. As a safeguard the question “Delete request from …?” appears first; only the second click deletes. Press Escape or click elsewhere to cancel. If neither a name nor an email address is stored, the question reads “Unknown”.
The status is a working aid for you and your team. The person who filled in the form never sees any of it.
The list loads the 500 most recent submissions; the numbers on the filters refer to that selection. Older requests are available through the CSV export. Every member may view and export them; changing the status or deleting is reserved for “Editor” and above.
Notification by email
So that you do not have to keep checking, XICflow forwards every new request by email.
-
Enter your address in the field “Notification email”.
The placeholder shows the format: “you@company.com — empty = no notification”.
-
Click “Save”. While it is being stored the button reads “Saving…”, then briefly “Saved”.
Below the field you find the note “Every new request is sent to this address (replies go directly to the sender).” So you can answer straight from your mail program. If no address is entered, XICflow falls back to the email address from your company details; if that is missing too, no notification goes out — but the request is always in the list.
The message carries the subject “Neue Anfrage von …” plus the name of the website, and contains name, email, phone, message and all custom fields. The reply address is the address of the person who wrote in: clicking “Reply” therefore answers them, not XICflow.
If the entry is incomplete, “Please enter a valid email address.” appears and the button stays disabled. If the address cannot be stored, XICflow reports “Email could not be saved.”
The address belongs to the individual website. If you look after several websites, enter it for each of them.
Passing requests on automatically
If you process requests in another program, you can have them sent there as well.
Below the notification address you find the field “Automation webhook (URL)”, whose placeholder shows the format: “https://hooks.zapier.com/… — empty = no webhook”. The note underneath reads “Every new request is additionally sent as JSON via POST to this URL (Zapier, Make, CRM). https only.” The matching address comes from the program that is meant to receive the requests. If you do not need this, simply leave the field empty.
What gets transmitted is the occasion (“form.submission”), the identifier of the website, the time of arrival and the request itself with name, email, phone, message, address, all custom fields and the name of the form.
Signing secret
As soon as you save an address for the first time, XICflow generates a “Signing secret” and shows it below the field; “Copy” puts it on your clipboard and the button briefly reads “Copied”. The note says: “Every call carries the header X-XICflow-Signature (HMAC-SHA256 over ‘timestamp.body’ using this secret). Verify it on the receiver to ensure authenticity.” The receiving program can thus establish that the data really comes from XICflow. If you clear the address again, the secret is kept — enter the same address later and the check keeps working unchanged.
The request is kept even if the call fails
The call has five seconds. If the other program does not answer or is unavailable at that moment, the request still stays in your list; XICflow does not try a second time. Addresses inside a private network are not called for security reasons.
For a faulty address you see “Please enter a valid https URL.”, and while saving “Webhook could not be saved.” may appear.
Exporting requests
All submissions can be downloaded as a table, for your records or for further processing.
Click “Export CSV” at the top right. While the file is being prepared the button reads “Exporting …”, then the download starts. Its name follows the pattern “anfragen-<website>-<date>.csv”. If it fails, XICflow reports “Export failed.”
The file contains the columns Datum, Status, Name, E-Mail, Telefon, URL and Nachricht (the headings are in German), plus one extra column for every custom form field. It is prepared so that common spreadsheet programs open it with German settings and with correct umlauts. Up to 5,000 entries are exported, starting with the most recent.
The date appears as “year-month-day hour:minute”, the status as “new”, “read” or “archived”. Archived entries are included. The export is open to every member, including a “Viewer”.
Retention and data protection
Requests contain personal data. XICflow therefore stores sparingly and tidies up on its own.
- By default, requests are kept for 180 days. After that they are deleted automatically and for good — the archived ones as well.
- The internet address of the sender is stored in shortened form only, so that no individual connection can be derived from it.
- If someone asks for their request to be deleted, “Delete” on the entry is enough; the record is then removed completely.
- The data export in the “Account” area (“Export my data”) contains the requests of all your websites including the custom form fields.
- Accepted and expired team invitations carry an email address and are deleted after 90 days.
Anything you want to keep beyond the retention period should be saved in good time using the CSV export. The note about processing form data is part of the privacy policy that XICflow generates for every website.
The four roles and what they may do
Every member has exactly one role. It decides which areas someone may only look at and which they may change.
- “Owner” — has full access including plan and billing. This role exists exactly once per account; it cannot be handed out by invitation and cannot be changed.
- “Administrator” — manages content and the team, creates websites, connects custom domains, invites people, changes roles and removes members — only plan and billing remain with the owner.
- “Editor” — maintains content, media and design and publishes the website, but manages neither the team nor domains.
- “Viewer” — may look at everything and export, but change nothing.
| What someone may do | Owner | Administrator | Editor | Viewer |
|---|---|---|---|---|
| View pages, requests, media library and history | included | included | included | included |
| Export requests as CSV | included | included | included | included |
| Handle requests: set status, delete | included | included | included | not included |
| Edit pages and blocks | included | included | included | not included |
| Publish the website | included | included | included | not included |
| Use the AI features (texts, images, chat) | included | included | included | not included |
| Media library: upload, edit, delete | included | included | included | not included |
| Change brand, design, header and footer | included | included | included | not included |
| Change notification email and webhook | included | included | included | not included |
| Save and restore versions | included | included | included | not included |
| Create or delete a website | included | included | not included | not included |
| Connect, check and remove a custom domain | included | included | not included | not included |
| Team: invite, change roles, remove | included | included | not included | not included |
| Switch plan, buy credits, cancel | included | not included | not included | not included |
The rule applies throughout: you can only assign and manage roles below your own. An administrator can therefore invite, change and remove “Editors” and “Viewers” — but not another administrator. Only the owner appoints new administrators.
Members without management rights simply see the note “Only owners and administrators can manage the team.” They see the seats and the member list, but neither the invitation form nor the pending invitations.
Seats: how many people can work with you
The “Team” tab shows how many seats your plan includes and how many of them are taken.
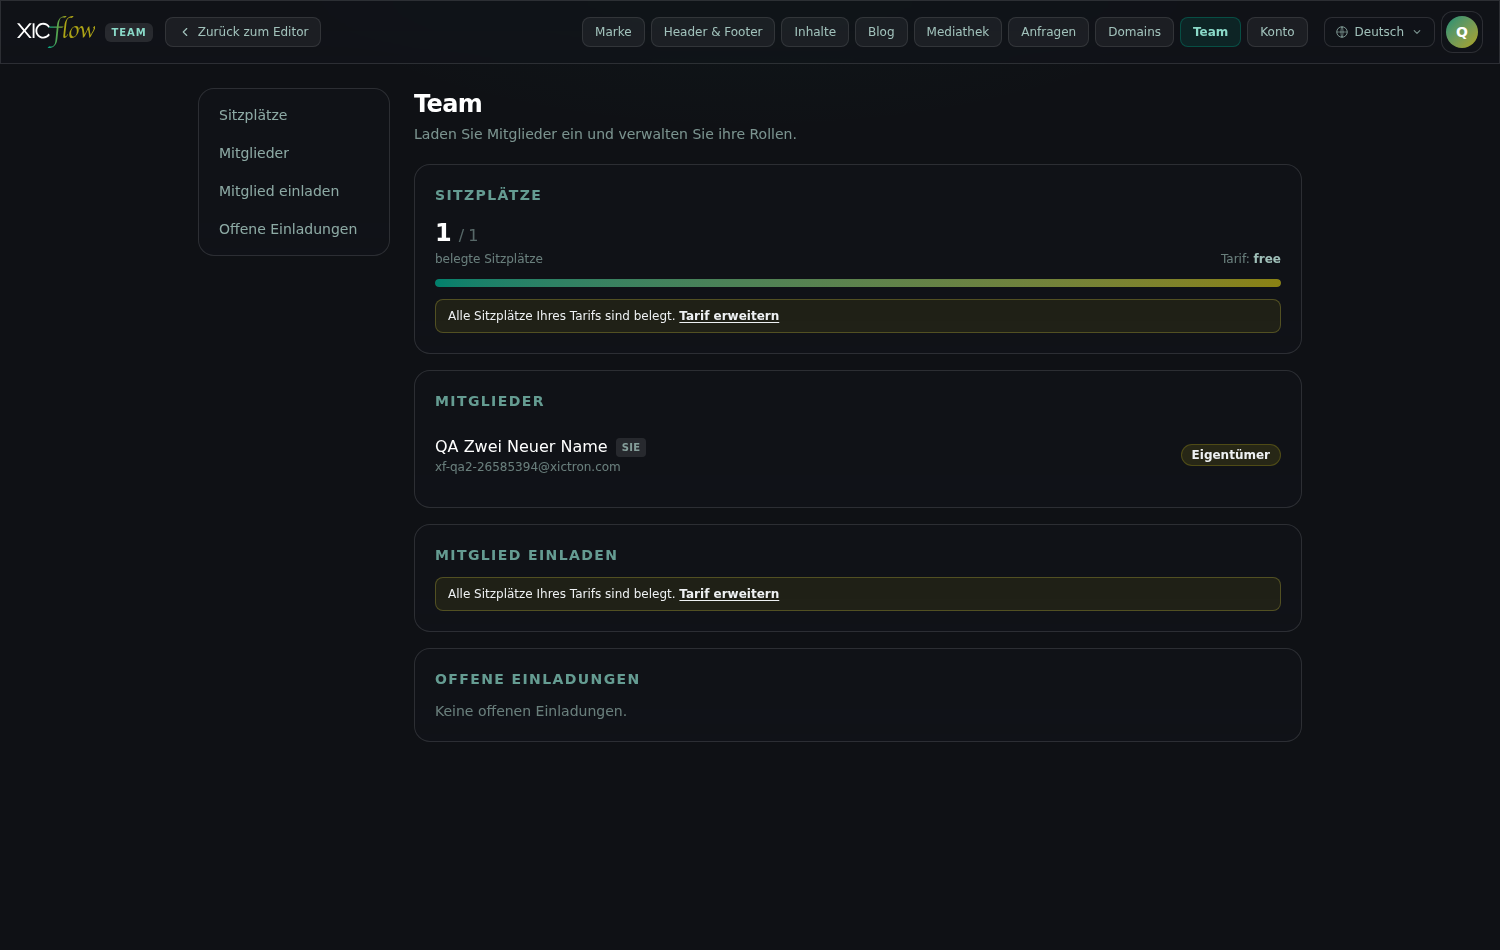
The page carries the heading “Team” and below it the sentence “Invite members and manage their roles.”
At the top you find the “Seats” section: as a fraction, how many of the seats included in your plan are taken (“seats used”), below it a bar for quick orientation, and on the right the current “Plan”. If your plan has no fixed limit, it reads “unlimited”. On large screens a jump list on the left leads to “Seats”, “Members”, “Invite member” and “Pending invitations”.
| Seats | Free | Starter | Pro | Premium | Agency |
|---|---|---|---|---|---|
| Seats in total (including the owner) | 1 | 1 | 3 | 10 | 50 |
| Invite further people | not included | not included | included | included | included |
Taken means all members plus every invitation that is still valid but not accepted yet. Expired invitations no longer count, but they remain in the list until you revoke them.
Once all seats are taken, the invitation form is replaced by the note “All seats on your plan are in use.” together with the link “Upgrade plan”, which leads to the “Account” area. You can then remove a member, revoke a pending invitation or move to a larger plan. If someone tries anyway, XICflow answers with “No free seats on the current plan.”
Inviting a member
An invitation consists of an email address and a role; the invited person does the rest.
-
Open the “Team” tab and the section “Invite member”.
-
Enter the address of the person under “Email address”.
The placeholder shows the format: “name@example.com”. Without an entry you see “Please enter an email address.”
-
Pick the appropriate role under “Role”.
Only roles below your own are offered.
-
Click “Invite”. “Invitation created.” appears.
-
Below it you find the “Invitation link (also sent by email):”.
With “Copy” you can pass it on yourself as well, for instance in a chat; after the click the button briefly reads “Copied”.
The invited person receives an email with the name of your team, the intended role, your name and the expiry date. Right afterwards the invitation appears in the “Pending invitations” section and occupies a seat.
If you invite the same address again, the new invitation replaces the old one: no second seat is used, but the link sent before stops working. In that case pass on the new link.
An invitation link is valid for 14 days
After that the page reports “Invitation expired”. Simply invite the person again in that case; the old link stays unusable.
Every address belongs to exactly one account
An email address that already has an XICflow account cannot be invited; XICflow reports “An account already exists for this email.” Choose another address of that person in that case — or they keep working with their own account.
Accepting an invitation
The invited person needs no existing account — they create it while accepting.
-
The invited person opens the link from the email and lands on the page “Accept invitation”.
It reads “You have been invited to join the team of … as …. Set your password to finish.” No sign-in is required for this.
-
The “Email address” is already filled in and cannot be changed.
-
They add “Your name” and a “Password”.
Below the password field it says “At least 10 characters.” If something is missing, “Please enter your name.” or “The password must be at least 10 characters.” appears.
-
A click on “Accept invitation” completes the setup; while it runs the button reads “Setting up …”.
After that the person is signed in and straight in the editor. The owner and the person who invited them are informed by email.
If the link does not lead to the form, the page names the reason — and always offers “To sign in”:
- “Invitation invalid” — “This invitation link is invalid or has already been used.” This also happens when the invitation was revoked or replaced by a new one.
- “Invitation expired” — “This invitation link has expired. Please request a new invitation.”
- “Already accepted” — “This invitation has already been accepted. Just sign in.”
If an account exists for the invited address in the meantime, the form reports “An account already exists for this email. Please sign in.” In case of a general fault it reads “The invitation could not be accepted.”
Pending invitations, changing roles, removing members
Who is on the team and who still has to accept is listed one below the other in the same tab.
Pending invitations
The section “Pending invitations” lists every invitation that has not been accepted yet, with address and role; expired ones are marked “expired”. If there are none, it reads “No pending invitations.” With “Revoke” you invalidate an invitation: the link that was sent stops working and the seat is free again.
Changing a role
For the members you are allowed to manage, a dropdown for the role sits on the right — a change takes effect immediately and applies the next time that person clicks. For everyone else the role is shown as a badge instead of a dropdown. Your own entry is marked “You”; you cannot change your own role (“You cannot change your own role.”), and the owner's role cannot be changed either (“The owner's role cannot be changed.”).
Removing a member
Next to the dropdown is “Remove”; after the click “Confirm remove” (or “Cancel”) appears. Once removed, XICflow confirms with “Member removed.” You cannot remove yourself or the owner (“You cannot remove yourself.”, “The owner cannot be removed.”).
Removing deletes the access completely
The account of that person is deleted, all their sessions end and they receive an email about it. The seat is free again afterwards. The website content they created stays untouched. If someone should merely stop changing things for a while, set them to “Viewer” instead.
If something goes wrong
The most common stumbling blocks around requests and invitations, and what helps in each case.
- No requests are arriving. Check in this order: is the website published? Does the page contain a “Contact form” or “Form” block? Did you publish again after adding it? Then send a test through the website yourself — the entry should show up under “Requests” within a few seconds.
- The test request was confirmed but is not in the list. Then the spam protection stepped in: submitted too quickly (less than three seconds after loading), several links in the message, an advertising term, an invalid email address or a website that is not published yet. Send again with real details and without links.
- The request is in the list, but no email arrived. Check the “Notification email” field and the spam folder of your mailbox. The request itself is not lost: it stays in the list even without an email.
- The “Save” button stays greyed out. It only becomes active once you have changed the value and the entry is valid. For a faulty address you see “Please enter a valid email address.”, for a faulty webhook address “Please enter a valid https URL.”
- “Requests could not be loaded.”, “Status could not be changed.”, “Request could not be deleted.” or “Export failed.” The connection to the server failed or your role does not allow the action. Reload the page and try again; if it persists, sign out and back in.
- “Your role does not allow this action.” or “You do not have permission for this.” The view shows the same buttons to every member; XICflow checks the role only when saving. Ask the owner or an administrator to give you a higher role or to make the change themselves.
- “All seats on your plan are in use.” or “No free seats on the current plan.” Remove a member, revoke a pending invitation or move to a larger plan via “Upgrade plan”. Bear in mind that expired invitations only disappear from the list once you revoke them.
- “This person is already on the team.” or “An account already exists for this email.” The address is already in use. Check the member list; if a separate account already exists, the person signs in with that one.
- “You cannot assign a role higher than your own.” Ask the owner or an administrator to send the invitation with the role you need.
- The invitation link does not work. If the page reports “Invitation expired” or “Invitation invalid”, revoke the old entry under “Pending invitations” and invite again. If it reads “Already accepted”, a normal sign-in is all it takes.
- “Action failed.” A team action could not be carried out. Reload the “Team” tab — the list then shows the actual state — and repeat the step.