On this page
- Publishing
- What happens in the background
- What gets published
- Preview and live version
- Draft, schedule, published
- Versions and undoing
- Search engines
- Legal pages
- Your xicflow.com address
- Adding your own domain
- DNS and verification
- Activating the domain
- Primary domain, www and addresses
- Removing, quota, permissions
- If something goes wrong
Publishing and your own domain
Everything you change in the editor stays an internal working state at first — visitors see none of it. Only “Publish” turns that state into the website available on the internet. This chapter covers the process, what exactly gets delivered, how to bring an earlier state back and how your own domain joins in.
What publishing does
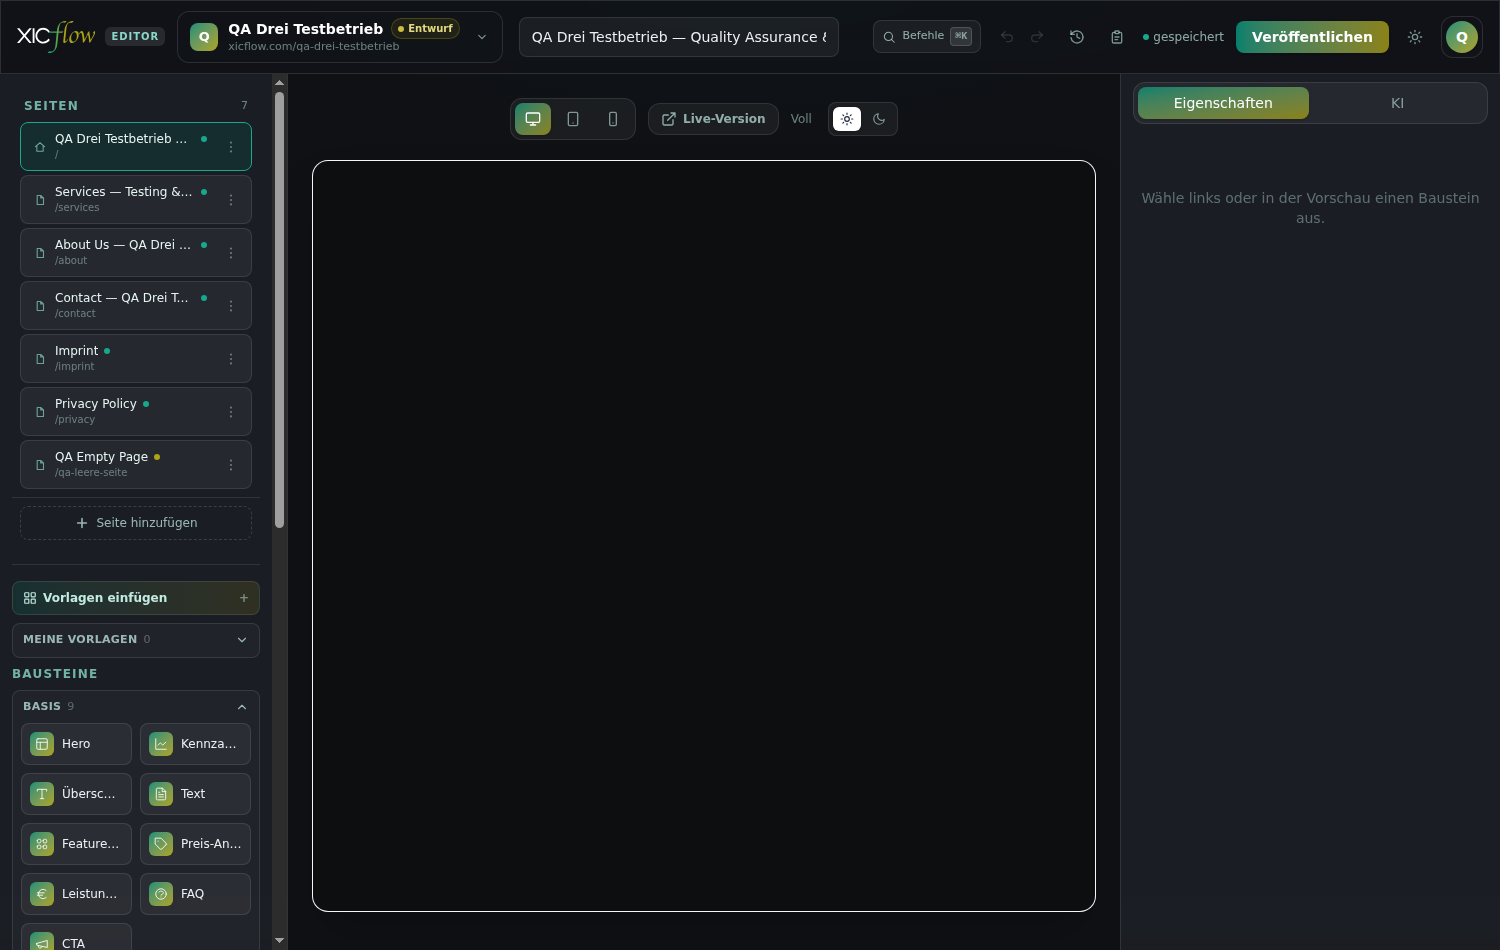
XICflow saves your changes in the editor as you work; the status indicator then reads “saved”. Saved is not the same as published — which is why several areas show the note “Saved. The changes are applied on the next publish.”
-
Open the editor with the website you want to publish.
-
Click “Publish” at the top right.
The process runs in the background, so you can keep using the editor meanwhile. Visitors never see a half-finished state.
-
Wait until the indicator changes from “Publishing…” to “Published”.
The address of your website appears next to it as a clickable link. Depending on the size of the website this takes a moment.
| Action | What happens | Who sees the result |
|---|---|---|
| Saving | Happens by itself in the editor; the indicator at the top switches to “saved”. | Only you and your team — in the editor live preview |
| Publishing | The saved state is built into a finished website and delivered. | Every visitor, at your address on the internet |
| Restoring | Brings an earlier state back as the working state. | You first — it goes live only with the next publish |
A double click does no harm: while a publish is running, another click does not start a second one, it shows the running job instead. Anything you change during the publish already belongs to the next state.
| Indicator next to the button | Meaning | What to do |
|---|---|---|
| “Publishing…” | The job was accepted and is being processed. | Wait; you can keep working |
| “Published” + address | The new state is delivered; the address is clickable. | Nothing — feel free to open the address and check |
| “2 contrast note(s) — review in Brand & Design” | The website is published; individual colour combinations fall short of the readability requirements. | Adjust the colours under “Brand & design” |
| “Publishing failed” or an error message | The process was stopped; the previous state stays live unchanged. | Note the wording, try again, otherwise contact support |
Pages set to draft are not delivered
In the page list every page carries the status “Published” or “Draft”. The actions “Publish” and “Set to draft” decide whether a page goes out with the next publish. The same applies to blog posts: “New and edited posts only appear on the live website once you publish the website again.”
Note about contrast
If a note such as “2 contrast note(s) — review in Brand & Design” appears after publishing, your website was published all the same. It means that individual colour combinations fall short of the readability requirements; you can adjust them under “Brand & design”.
What happens in the background
Several steps sit between your click and the finished website. You do not have to trigger any of them yourself — but it helps to know where things can stall.
| Step | What XICflow does | Why |
|---|---|---|
| 1 · Flush pending edits | Changes not yet written in the editor are saved first. | So the build really reads your latest state |
| 2 · Check mandatory pages | Imprint and privacy pages are created if they are missing. | Both are required by law |
| 3 · Queue the job | The process is queued as a job and handled in the background. | Long builds must not block the editor |
| 4 · Check colours | Colour combinations are checked against the readability requirements. | A note, not a blocker — publishing continues |
| 5 · Write the content | Pages, posts, navigation, theme and company details are written from the database into files. | The website is built from those files |
| 6 · Build the website | The finished website is generated from those files. | Finished pages are fast and need no database |
| 7 · Take the images along | Images in use are copied into the website as its own files. | The website loads its images from its own address |
| 8 · Switch over in one go | The new state replaces the old one in a single step. | Visitors never see a half-finished state |
| 9 · Record a version | The published state is stored as a version, the website counts as “Published”. | A way back to an earlier state |
| 10 · Refresh the knowledge base | The assistant on your website learns the newly published state. | It never answers from drafts |
The eighth step matters most to your visitors: the new state is first assembled completely next to the old one and only then put in its place in a single move. That is why there is never a moment in which the website is half old and half new. If that step fails, the previous state is reactivated.
| Rule | Behaviour | Default |
|---|---|---|
| Time budget for the build | If the build takes longer, the process stops with a message. | 300 seconds |
| Time budget for the whole job | Covers writing, building and switching over. | 600 seconds |
| Second attempt | A stopped job is not repeated automatically. | no automatic restart |
| Double click | A second click does not start a second job; it shows the running one. | always |
| Several websites at once | Jobs are processed one after another, never in parallel. | always |
| Stuck job | Is marked as failed so that you can publish again. | 30 minutes running, 120 minutes waiting |
| Notification | If publishing fails, an email goes to the account owner. | subject “Veröffentlichung fehlgeschlagen” |
The previous state stays online
If a publish stops, nothing changes on your website on the internet: the last successfully published state keeps being delivered unchanged. A failure therefore never costs you the website that is running.
What gets published
Publishing collects the complete state of your website — not just the page you edited last. The overview below shows what goes along.
| Element | What is published | Where you maintain it |
|---|---|---|
| Pages | Every page with the status “Published”, in the order of the page list. | Editor, page list |
| Blocks | Every visible block of the visible sections, in their order. | Editor, canvas |
| Languages | Every active language that has a translation of the page. | “Brand & design”, languages section |
| Blog posts | Posts whose date has been reached and that are not drafts. | “Blog” area |
| Navigation | The visible entries of the main menu, per language. | “Header & footer” area |
| Header and footer | The blocks maintained there, per language. | “Header & footer” area |
| Design | Colours, fonts and the remaining theme settings. | “Brand & design” |
| Logo and favicon | Wordmark, symbol and the icon files derived from them. | “Brand & design” |
| Company details | Name, address, phone, email, VAT ID and register entry. | provided when setting up the website |
| Media | Every image in use is delivered as a file of its own. | Media library |
| Legal pages | The list of legal pages the footer links to. | automatic + “Header & footer” area |
| Contact target | Recipient address of the forms. | “Requests” area |
| Popup | An enabled popup including trigger and frequency. | “Brand & design”, popup section |
| Search engine details | Meta title, description, indexing, canonical, previous paths, your own structured data. | Editor, “SEO & meta” per page |
Images become a part of your website in the process: every image from the media library that is in use is delivered as a file of its own and loaded from your own address. If an image file is missing, that single image is skipped — the publish continues.
If the AI assistant is enabled for your website, it is published along with it and answers on the basis of the newly published state afterwards — it does not know drafts or posts that are not due yet.
| Not delivered | Why | How to make it visible |
|---|---|---|
| Pages with the status “Draft” | A draft is a working state, not a published page. | Set it to “Publish” in the page list |
| Archived pages and posts | Archived means: taken out of circulation. | Set the status back to “Published” |
| Scheduled items with a future date | The date has not been reached yet. | Wait for the date, then publish again |
| Hidden sections and blocks | Whatever is hidden in the editor is not part of the page. | Show it again in the editor |
| Languages without a translation | Without a translation there would be an empty page. | Create the translation of the page |
| Deleted pages | They disappear from the website with the next publish. | not applicable |
| Internal settings | Credentials and keys, for example the secret of a forward to your own systems. | not applicable — they deliberately stay internal |
| Requests and account data | They belong to the account, not to the website. | not applicable |
Deleted items disappear with the next publish
Publishing rewrites the set of pages and posts of your website completely. A deleted page is then gone from the internet as well — before that it stays reachable at its address.
Preview and live version
The large area in the editor is the “Live preview”. It shows your current working state — including what nobody else can see yet. The switches above it move between “Desktop”, “Tablet” and “Mobile” and between light and dark display.
To see what visitors actually get, use “Live version” above the preview: it opens the published page in a new tab, in the language you are currently editing. Comparing both views is the simplest way to check whether a change is already live.
The button always leads to the address on xicflow.com — even when your own domain is already connected. Both addresses show the same published state. It opens exactly the page you are working on; for the home page that is the language entry point.
| What | Address | Purpose |
|---|---|---|
| Home page | /en/ | Entry point in the respective language |
| Sub page | /en/<page-slug>/ | Every published page |
| Blog overview | /en/blog/ | List of posts |
| Post | /en/blog/<post-slug>/ | A single post |
| Imprint | /en/imprint/ | Mandatory information |
| Privacy | /en/privacy/ | Privacy statement |
| Sitemap | /sitemap.xml | Address directory for search engines |
| robots.txt | /robots.txt | Rules for search engines, pointer to the sitemap |
| llms.txt | /llms.txt | Short overview of the website in text form |
| Feed | /feed.xml and /en/blog/rss.xml | Posts to subscribe to |
| Error page | /404.html | Shown for unknown addresses |
| Images | /_img/… | The image files delivered with the site |
The “Blog” area has a preview of its own as well. The note below it states what it shows: “Shows the published state. Changes appear after saving and publishing.”
Draft, schedule, published
Every page and every post carries a status. It decides whether the content goes out with the next publish — regardless of how finished it looks in the editor.
| Status | Where it appears | What visitors see |
|---|---|---|
| “Published” | Page list in the editor, “SEO & meta” for posts | The page, as soon as you have published the website |
| “Draft” | Page list in the editor, “SEO & meta” for posts | Nothing — the page is not delivered at all |
| “Scheduled” | “SEO & meta” of a post, together with the “Date” field | Nothing before the date; the post afterwards |
| “Archived” | Post list in the “Blog” area | Nothing — the post is out of circulation |
Blog posts add the “Date” field. The note in the “SEO & meta” area sums up the rule: “A future date + “Scheduled”/“Published” = automatic release at that time.” A post whose date still lies in the future is not delivered; it appears with the first publish on or after its date.
| Type | How it reaches the website | Address |
|---|---|---|
| Regular page | As a page of its own, provided the status is “Published”. | /en/services/ |
| Home page | As the entry page per language. | /en/ |
| Blog post | As a post in the blog, once its date has been reached. | /en/blog/my-post/ |
| Legal text | Through a route of its own, generated from your company details. | /en/imprint/ |
| Header and footer | Not as a page of its own, but as the frame around every page. | no address of its own |
| Collection entry | As a flat detail page, if the collection keeps detail pages. | /en/<entry>/ |
Visibility in the editor counts too
Besides the status, visibility matters: a hidden section and a hidden block are not delivered. That is handy for preparing content without setting the whole page to draft.
Versions and undoing
Every publish leaves a state you can return to. You find it in the editor under “Version history” — its subtitle names the three sources: “Publish states, AI changes & checkpoints”.
| Entry | How it comes about | Marker in the list |
|---|---|---|
| Publish state | On every successful publish. | Marker “published” on the most recent state |
| AI change | Before the assistant makes larger changes to the website. | Label of the change |
| Your own checkpoint | Via “Save current state”, with an optional label. | Your label, otherwise “Manueller Checkpoint” |
| Backup before a restore | Automatically, right before an older state is brought back. | newest entry after the restore |
-
Open the “Version history” in the editor.
The list starts with the most recent state; each entry shows number, label, time and the person.
-
Click “Restore” on the state you want and confirm with “Yes, restore”.
The note below states what happens: “Replaces the current content with version … The current state is automatically saved as its own restore point first.”
-
The editor reloads and shows the restored state.
-
Publish the website so the restored state also appears on the internet.
Until then, visitors keep seeing the last published state.
Restoring alone does not change the website
A restored state is only your working state at first. It goes live with the next publish. The other way round: as long as you do not publish, you can try things out safely.
Before a bigger rebuild it pays to set your own marker: “Save current state” creates a checkpoint with a short label. The history shows the 200 most recent entries.
Who did what and when sits next to it under “Activity”. The note there reads: “AI actions, publishes and checkpoints appear here automatically.” That view is history only — restoring happens in the version history.
What happens with search engines
Every publish also generates the files search engines expect. You do not have to set anything up; you steer the result per page under “SEO & meta”.
| File | What it contains | What you influence |
|---|---|---|
| sitemap.xml | Every indexable address, one entry per language, plus links to all language versions, a change date and a weighting. | Which pages may be indexed and which languages are active |
| robots.txt | Allows search engines access, names individual AI crawlers explicitly and points to the sitemap. | nothing — the file is generated automatically |
| llms.txt | Name, short description and the most important pages as a list of links. | Navigation and page titles |
| feed.xml | The published blog posts for subscribing. | Posts and their dates |
Multilingual websites are linked up cleanly: every page points to its versions in the other languages, and an additional entry names the primary language as the default for all remaining cases. The same links appear in the sitemap. A language for which a page has no translation does not show up there.
| Setting | Choice or input | Effect |
|---|---|---|
| “Index (index, follow)” | default | The page may enter the search index and appears in the sitemap |
| “noindex, follow” | choice | The page stays out of the index, links are followed; it drops out of the sitemap |
| “noindex, nofollow” | choice | The page stays out of the index, links are not followed; it drops out of the sitemap |
| “Canonical URL (override)” | free address; empty = automatic from domain and path | Defines which address counts as authoritative |
| “Previous paths (301 redirect)” | list of paths | Old addresses redirect permanently to the current one |
| “JSON-LD (structured data)” | your own data block | Is emitted in addition to the automatic details |
| “Meta title” and “Meta description” | per language | Text in the search result; an empty title = page title |
- Pages set to “noindex” drop out of the sitemap automatically.
- Legal pages always carry “noindex” — they do not belong in the search index.
- The blog overview is only advertised if there really are published posts.
- If you rename a page, XICflow remembers the old path and permanently redirects it to the new address.
A draft is not a “noindex”
A page set to draft is not delivered at all — so it does not exist on the internet, rather than merely being unlisted. “noindex”, by contrast, applies to pages that should be reachable but not indexed — a thank-you page after a form submission, for example.
Legal pages come along
Before every publish XICflow checks whether the legally required pages exist and creates missing ones. Pages that already exist are left untouched.
| Page | Created automatically | Basis |
|---|---|---|
| Imprint | yes — before every publish, if it is missing | Section 5 DDG |
| Privacy | yes — before every publish, if it is missing | Article 13 GDPR |
| Terms | no — an editorial decision | only needed if contracts are concluded through the website |
| Withdrawal | no — an editorial decision | only needed for distance selling to consumers |
| Accessibility statement | no — an editorial decision | depends on the size and type of the business |
The content of the two mandatory pages is generated from the company details of your website — name, authorised representative, address, phone, email, VAT ID. If those details are incomplete, so is the legal text. It is therefore worth reading both pages calmly once after the first publish.
In the footer you decide under “Legal texts (footer column)” which of those pages are linked. The note there names the usual selection: “Default: Imprint / Privacy / Terms / Accessibility.”
Automation does not replace legal advice
XICflow makes sure the imprint and privacy pages exist and are generated from your details. Whether your case requires additional texts — terms or a withdrawal notice, for instance — is your decision; those pages are deliberately not forced.
Your address on xicflow.com
As soon as you publish for the first time, your website is reachable at an address of the form your-short-name.xicflow.com — no domain of your own required.
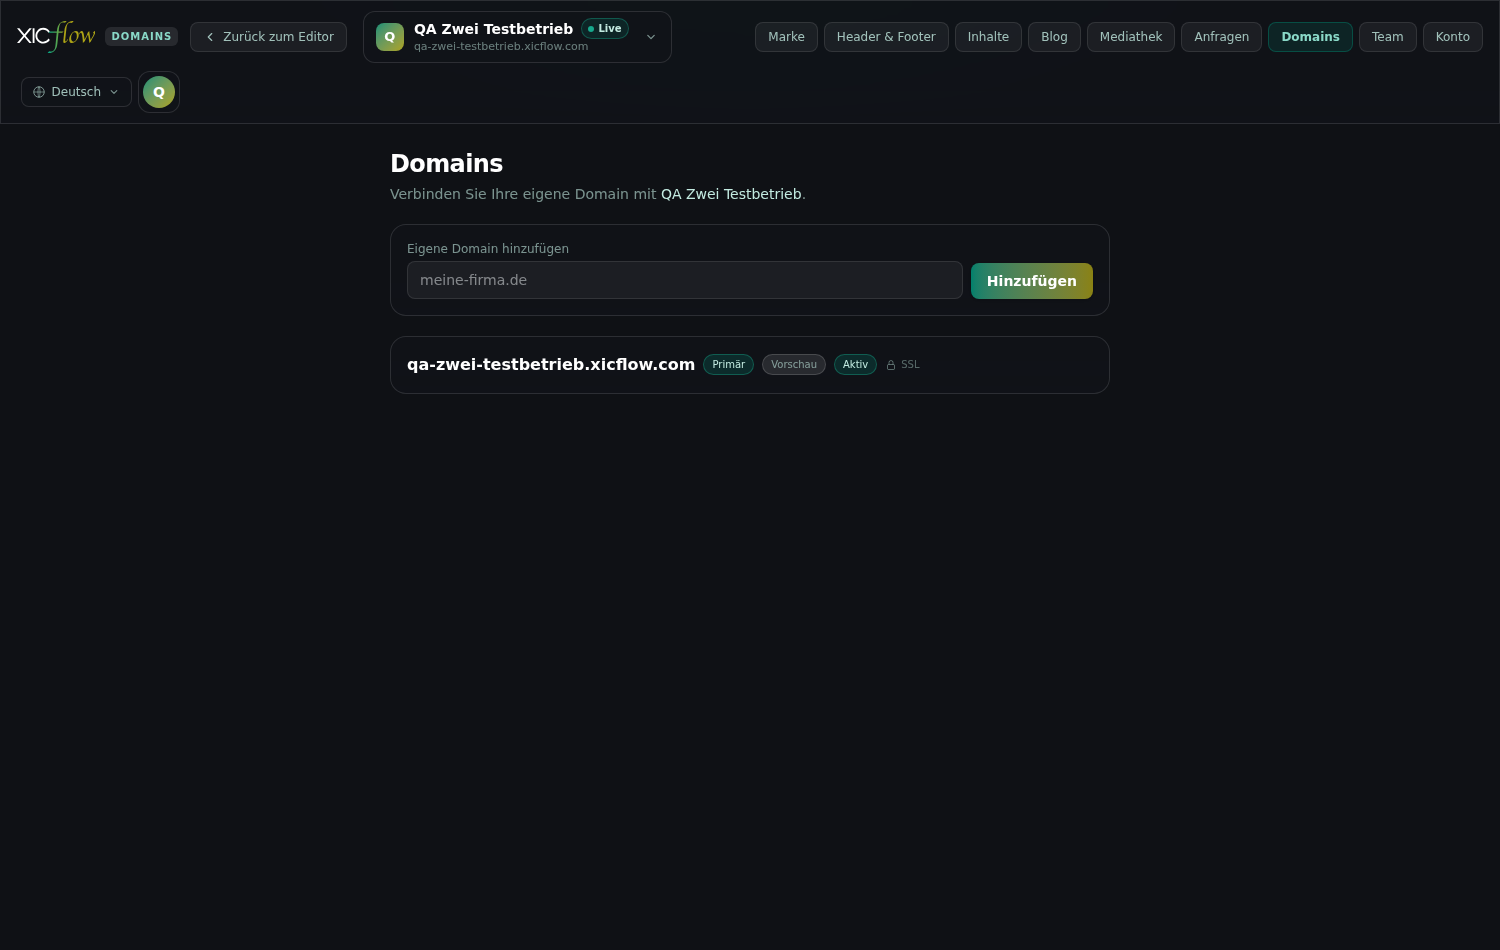
In the “Domains” area this address appears with the marker “Preview” and the status “Active”. It is encrypted (https) and works well for showing the website in advance while your own domain is not connected yet.
- The address is derived from the short name of the website; that short name is unique across all accounts.
- You neither have to set DNS records nor verify anything for it.
- The address does not count towards your plan quota for custom domains.
- It stays in place even when your own domain joins later.
Adding your own domain
You reach the area through the “Domains” tab in the header or from the account menu under “Your domains”. Start by selecting the website you mean at the top.
-
Enter your domain under “Add your own domain”, for example my-company.com.
You can leave out a leading https://; upper and lower case do not matter.
-
Click “Add”.
While the domain is being registered the button reads “Registering…”.
-
Read the message “Domain registered. Set up the DNS records shown below, then verify.”
The domain now appears in the list with the status “DNS pending”.
| Kind of address | Example | Records required at your provider |
|---|---|---|
| Domain without www | my-company.com | TXT for the proof + A record pointing to our server address |
| Address with www | www.my-company.com | TXT for the proof + CNAME record pointing to our target |
| Preview address | your-short-name.xicflow.com | none — it is reachable right away |
With and without www
If you want to use both my-company.com and www.my-company.com, add each of the two addresses separately. Each gets its own proof and its own record — the domain without www an A record, the www address a CNAME record.
A domain can only ever be connected to one website. If it is already taken, XICflow reports that when adding; release the existing connection first in that case.
Setting DNS records and verifying
Below every domain that is not active yet you find the box “Set these DNS records at your domain provider:”. Each record lists “Type”, “Name” and “Value”; clicking a value copies it to the clipboard.
-
Sign in with the provider you bought your domain from and open its DNS management.
-
Create the TXT record shown.
It proves that the domain belongs to you. Its name starts with _xicflow-verify, its value is a long string generated for your domain.
-
Create the second record shown.
For a domain without www this is an A record, for a www address a CNAME record. Copy name and value exactly as displayed.
-
Return to XICflow and click “Verify” on the domain.
The note below states the usual waiting time: DNS changes often take 5–30 minutes.
-
On success you see “Domain verified. You can now activate the domain.”
The status changes to “Verified”. Otherwise “Not verified yet. DNS changes can take some time.” appears — in that case try again later.
| Record | Name | Value | What for |
|---|---|---|---|
| TXT | _xicflow-verify.<your-domain> | the string shown | Proves that the domain belongs to you |
| A | your domain without www | the server address shown | Takes visitors to your website |
| CNAME | your www address | the target shown | Takes visitors to your website |
When verifying, XICflow queries the TXT record several times in a row before giving up — that absorbs short delays at your provider. If the check fails, the message names the values actually found. That is the fastest route to a typo.
The proof does not change your website yet
The TXT record only proves that you control the domain. Visitors are taken to your website by the A or CNAME record — so both records are needed.
Activating the domain
Once the domain is verified, only the activation is left. It sets up the encrypted connection for your address and points the delivery of your website at it.
-
Click “Activate” on the verified domain.
-
The message “Domain is being activated (SSL certificate being issued).” appears.
The encryption for your domain is set up; XICflow records the expiry date of the certificate.
-
If it reads “Activation started — the final step is enabled by us.”, there is nothing further for you to do.
-
As soon as the status reads “Active”, your website is reachable under your own domain.
Active domains additionally carry an “SSL” marker.
| Activation step | What is checked or set up | If it stalls |
|---|---|---|
| 1 · Check the resolution | Does your domain really point to our server? A and AAAA records are checked, for www also the CNAME. | Not an error state — the domain stays as it is, click “Activate” again later |
| 2 · Create the address | Your domain is set up on the hosting as an additional address. | If that step is not enabled on our side, XICflow reports “Activation started” |
| 3 · Issue the certificate | A certificate for the encrypted connection is issued for your address. | As long as the record stays set unchanged, the step succeeds on the next attempt |
| 4 · Register the delivery | The address is mapped to your website directory and the delivery is reloaded. | The change is tested first and rolled back if it fails |
| Indicator | Meaning | Next step |
|---|---|---|
| “DNS pending” | The domain is registered, ownership is not proven yet. | Set the records, then “Verify” |
| “Verified” | Ownership is proven. | Click “Activate” |
| “Active” | The website is delivered under this address. | nothing |
| “Error” | A step of the activation failed. | Check the records, click “Activate” again |
| “Primary” | This address is the main address of the website. | nothing |
| “Preview” | The address on xicflow.com that comes with the site. | nothing |
| “SSL” | Encryption is set up for this address. | nothing |
Clicking again is harmless
Activation resumes where it stopped last time. A second click on “Activate” therefore does not repeat everything; it carries out the step that is still open.
Primary domain, www and the addresses of your pages
If several addresses are connected, exactly one carries the marker “Primary”. It is the main address of your website and decides which addresses appear in links, in the sitemap and in the details for search engines.
| Primary domain | Resulting base address | Consequence |
|---|---|---|
| your-short-name.xicflow.com | https://your-short-name.xicflow.com | Addresses in sitemap and canonical without www |
| my-company.com | https://www.my-company.com | Addresses in sitemap and canonical with www |
| www.my-company.com | https://www.my-company.com | Addresses in sitemap and canonical with www |
For a custom domain the base address is derived with a leading www — even when the domain itself is entered without www. So add both addresses and set up both records, so visitors arrive under either spelling.
The “Primary” marker moves on automatically when you remove the previous main address: a remaining connected address takes its place. To get the changed base address into the sitemap and the links, publish the website again afterwards.
Book a consultation
We suggest two appointment slots — by phone or at your premises.
Removing a domain, quota and permissions
A connection can be released again at any time. How many custom domains you can have connected at once depends on your plan — and who may manage them depends on the team role.
-
In the row of the domain, click the bin icon on the right (“Remove domain”).
The preview address on xicflow.com does not have that icon — it belongs to the website permanently.
-
Confirm the question “Remove domain …?”.
Your website is then no longer delivered under that address; the address on xicflow.com remains. Please delete the DNS records at your provider yourself.
The preview address on xicflow.com does not count towards the quota. Once the limit is reached, XICflow reports when adding that the limit of your plan has been reached. You then have two options: remove a connected domain you no longer need — or choose a larger plan under “Account & billing”. In the “Choose plan” overview each plan states how many “custom domains” are included; “Select” switches the plan.
| Plan | Custom domains | Publishes per month | Websites |
|---|---|---|---|
| Free | none | 3 | 1 |
| Starter | 1 | 30 | 3 |
| Pro | 3 | 150 | 10 |
| Premium | 10 | 600 | 25 |
| Agency | 50 | 5000 | 100 |
The number of publishes is counted per calendar month and shown in the usage overview under “Account & billing”. The number of websites, by contrast, is a stock figure: it states how many websites may exist at the same time.
| Role | Publishing | Managing domains |
|---|---|---|
| Owner | yes | yes |
| Admin | yes | yes |
| Editor | yes | no — view only |
| Viewer | no | no — view only |
Domains are an administrative matter
Adding, verifying, activating and removing a domain are reserved for the “Admin” role and the owner. Editors and viewers see the list but change nothing in it. Publishing, on the other hand, is open to every role from “Editor” upwards.
If something goes wrong
The most common problems around publishing and domains — and what is usually behind them.
- After “Verify” the status still reads “Not verified yet”.
- Usually the record has not spread everywhere yet. Wait 30 minutes and click again. Also check that name and value of the TXT record were copied exactly — some providers append the domain name automatically, so it must not be entered a second time.
- The message lists the TXT values found, but none of them matches.
- Then a different value sits in the zone — often an old proof from a previous provider. Compare the value character by character with the one shown in the box and remove surplus quotation marks or spaces.
- When adding you see “Please enter a valid domain (e.g. my-company.com).”
- Enter the plain domain name only — without a leading https://, without a path and without spaces.
- When adding, XICflow reports that the domain is already registered.
- The domain is already connected to a website. Check your other websites in the “Domains” area and release the connection there before adding the domain again.
- After “Activate” a status line appears that talks about resolution.
- Then ownership is proven, but the A or CNAME record does not point to our server yet. The message names the expected and the found value. Correct the record or wait for it to spread, then click “Activate” again — the domain stays in its previous state meanwhile.
- You see “Activation started — the final step is enabled by us.”
- That is not an error. The final step runs with elevated rights on the server and is enabled by us. There is nothing further for you to do; the domain stays in its current state until then.
- The domain shows the status “Error”.
- Click “Activate” again. If the status stays, check whether the A or CNAME record is still set unchanged; if it was altered afterwards, the encryption cannot be set up.
- The bin icon is missing on the xicflow.com address.
- That is intentional: the preview address belongs to the website and cannot be removed on its own. Only your own domains can be removed.
- A change does not show up on the website.
- Check in this order: does the status read “saved”? Did you click “Publish” afterwards? Is the page in question set to “Published” rather than “Draft” in the page list? Is the block set to visible in the editor? Then reload the page in your browser once.
- A deleted page is still reachable.
- Deleting only affects the working state at first. Publish the website once; afterwards the page is gone from the internet as well.
- A post with a future date does not appear.
- That is intended: posts are not delivered before their date. Publish the website again on or after that date and the post appears.
- An image is missing on the published page.
- If the source file is missing, that single image is skipped so the whole publish does not fail. Check the image in the media library, set it again in the block and publish once more.
- Publishing stops with an error message.
- The message appears next to the “Publish” button, and an email goes to the account owner. The previously published state stays online unchanged. Try again after a short while. If the error persists, note the wording of the message and contact support.
- “Publishing…” stays on screen for a very long time.
- Large websites take longer, and several jobs are processed one after another. If a job gets stuck, it is marked as failed once the time budget has passed — after that you can publish again.
- The “Publish” button cannot be used.
- Check whether a website is selected at the top and whether a publish is already running. As an invited member you also need at least the “Editor” role; viewers may only read.