On this page
Account, plans and security
The “Account” area shows which plan is running, how much you have used this month and which invoices exist. The “Security & sign-in” page is where you set up your password, two-factor authentication and passkeys.
Ways into your account
As long as no session exists, XICflow shows the sign-in screen. On the right sits the form under the heading “Welcome back” with the line “Sign in to keep building.”; on the left there is a short product introduction without any controls.
Signing in
The form takes “Email” and “Password”, with the “Sign in” button below. If the details do not match, an error appears below the form — the precise reason, or the general note “Sign-in failed”. Below the “or” divider there are two further routes: “Sign in with passkey” — only visible if your browser supports passkeys — and “Sign in with Google”. If the passkey route breaks off, it ends with your device's own message or with “Passkey sign-in failed”.
Creating an account
Under “New to XICflow?”, “Create account” opens the registration form with the fields “Name”, “Email” and “Password”. Below the password field it says “At least 10 characters.” — anything shorter is accepted neither by the form nor by the server. If something is missing, the note appears right at the field: “Please enter your name.” or “Please enter your email address.” Other cases — an address already in use, for instance — are named in plain words or summed up as “Registration failed”. While the account is being created the button reads “Creating account…”; after that you are signed in straight away, with no extra login step. “Already have an account? Sign in” takes you back to the sign-in form.
The second step with two-factor sign-in switched on
With two-factor sign-in switched on, “Sign in” is followed by the prompt “Enter the 6-digit code from your authenticator app.” For screen readers the input is named “TOTP code”, and it accepts one of your backup codes just as well. “Confirm” completes the sign-in, “Back” returns to the form. A wrong code is rejected — with the reason in plain words or the general note “Invalid code”; after five failed attempts the second step stays locked for around ten minutes.
Looking around without an account
At the very bottom, under “Just looking?”, sits the button “View without signing in (demo)”. It opens the editor as a pure hands-on demo: you can touch everything, but nothing is saved. “Back to website” at the top right returns you to the public XICflow site.
There is no self-service for forgotten passwords
The sign-in screen has no “forgot password” function. So register a passkey or connect a Google account while you are still signed in — either route gets you into the account without a password. If you are locked out completely, please contact us.
The account page
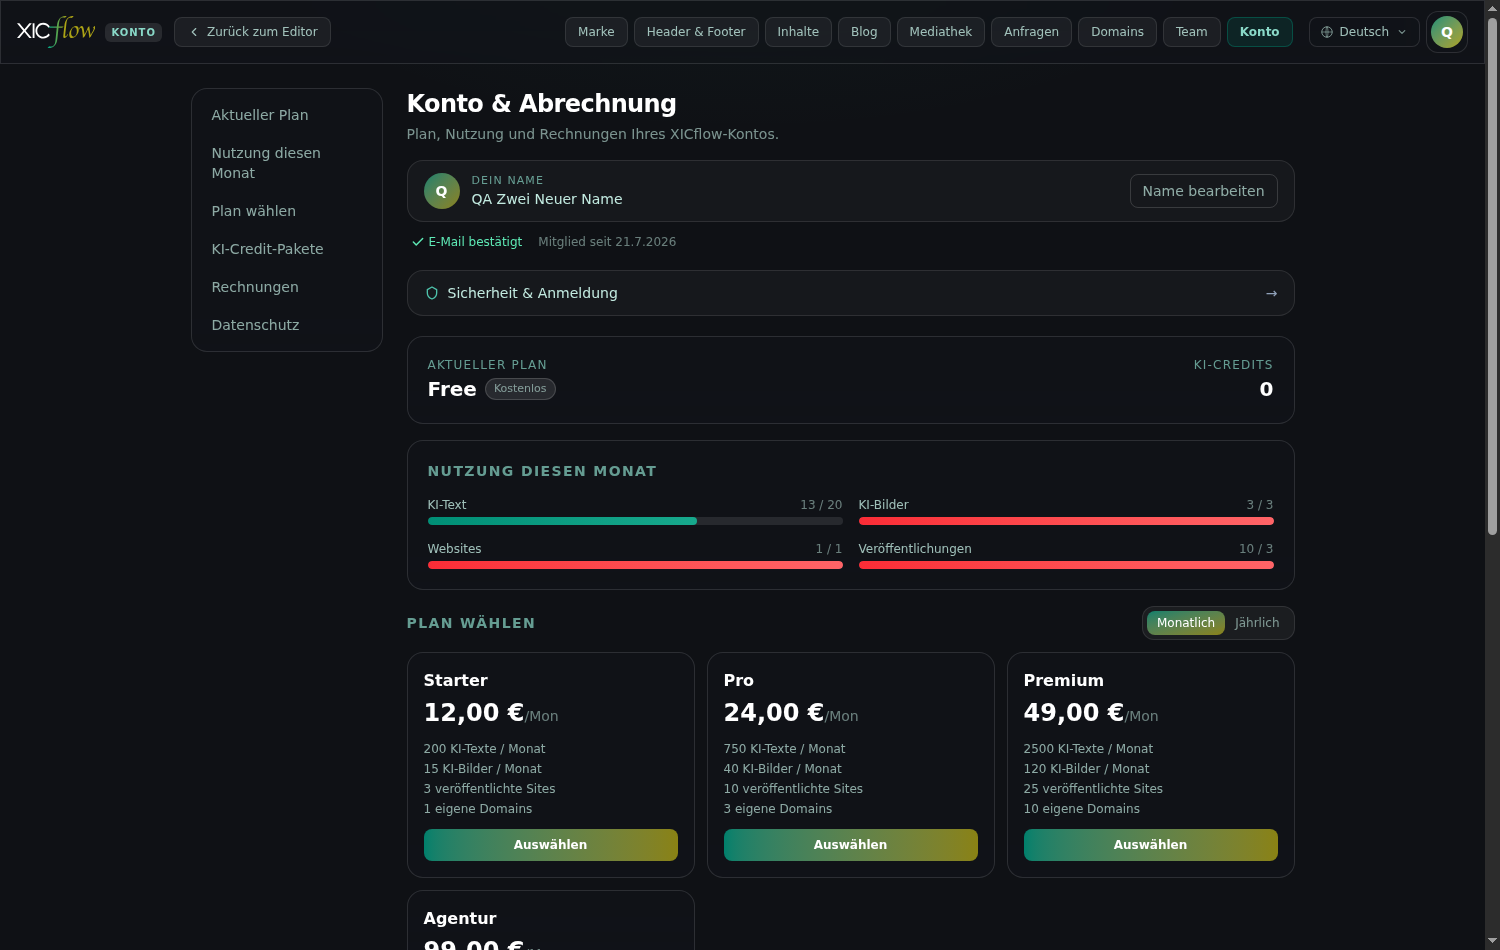
Open the area from “Account” in the header. The page is headed “Account & billing” and brings plan, usage and invoices together in one place.
Below the heading sits the summary “Plan, usage and invoices for your XICflow account.” On wide screens a jump list accompanies the page on the left; it leads to “Current plan”, “Usage this month”, “Choose plan”, “AI credit packs”, “Invoices” and “Privacy”. On narrow screens it is left out and the sections follow one another in the same order.
Your display name sits at the top under “Your name”. Choose “Edit name”, type the new name and select “Save”; the page confirms with “Name changed.” “Cancel” discards the change; the name may be 190 characters long at most. Below it you see either “Email verified” or “Email not verified”, together with “Member since” and the date your account was created. There is no field for the email address itself.
The “Current plan” card names your plan and its state, “Active” or “Free”; next to it your balance appears under “AI credits”. On a paid subscription you also see “Next billing” with date and amount, on a scheduled cancellation “Ends on” plus the banner “Your subscription ends on”. During a trial the card reads “Your trial ends on”.
Between the header details and the plan, a row with a shield icon leads to the “Security & sign-in” page. If the page cannot be loaded it reads “Account data could not be loaded.”; if a single action fails, XICflow reports “An error occurred.” In both cases your data itself is untouched.
Usage and quotas
The “Usage this month” section shows four bars in the form “used / quota”.
- “AI text” — page copy, blocks, legal texts, SEO texts, translations, image descriptions and blog posts.
- “AI images” — images generated by the AI.
- “Websites” — how many websites you have; not a monthly figure but a standing limit.
- “Publishes” — how often you published during this month.
An infinity sign means there is no limit for that row; from 70 and from 90 percent the bars take on a more noticeable colour. Once a monthly quota is used up, the next action is paid from your AI credit balance.
Counting happens per action, not by length of text; failed operations are left out. The three monthly figures refer to the current calendar month and reset on the first day of the month; “Websites”, by contrast, counts what you hold and only changes when you create or delete a website. Conversations with the AI assistant run on their own, separate budget and do not appear in these four bars. Storage has no bar here either — it limits the media library.
What an action beyond the quota costs
Page copy, blocks, translations and image descriptions.
One AI-generated image in standard quality.
One image in premium or 4K quality.
If the balance is empty as well, the action stops. The AI chat then shows “Quota reached — upgrade now” with the buttons “Upgrade now” and “Later”; elsewhere you get the notice “Your AI quota is used up for this period.”
Storage cannot be topped up with credits
Storage has no credit fallback. Once it is full, the media library stops accepting uploads and points you to a larger plan or to deleting media you no longer need.
The compact display in the editor
You do not have to switch to the account page for an interim figure: a narrow bar above the input field of the AI column carries “AI images”, “Text” and “Credits”. The first two show “used/quota”, the third your balance. The explanations on hover read “AI images used”, “AI text actions used” and “AI credits available”; screen readers announce the bar as a whole, starting with “AI quota —”. The values refresh as soon as you return to the window.
What the plans include
The monthly figures start over with every calendar month. Websites, storage and custom domains are standing limits instead: they apply permanently rather than per month.
| Included | Free | Starter | Pro | Premium | Agentur |
|---|---|---|---|---|---|
| AI texts / month | 20 | 200 | 750 | 2,500 | 20,000 |
| AI images / month | 3 | 15 | 40 | 120 | 400 |
| Websites | 1 | 3 | 10 | 25 | 100 |
| Publishes / month | 3 | 30 | 150 | 600 | 5,000 |
| Storage | 0.5 GB | 5 GB | 25 GB | 100 GB | 500 GB |
| Custom domains | 0 | 1 | 3 | 10 | 50 |
The image quotas are smaller than the text quotas because generated images are considerably more demanding. If you need many images regularly, a larger plan or additional credits is the better fit.
All figures apply per account, not per website: if you run several websites or work as a team, you share the same quotas. For storage, the web variants XICflow derives automatically count alongside the original files you upload. The prices of the plans are listed on the pricing page; they also appear on the cards in the “Choose plan” section.
Switching plan and buying credits
Switching runs through the “Choose plan” section; payment happens on a secure checkout page.
-
Go to the “Choose plan” section.
It sits below the “Current plan” card.
-
Pick “Monthly” or “Yearly” at the top right.
The cards then show the prices for that billing period.
-
Compare the cards.
Each card lists “AI texts / month”, “AI images / month”, “published sites” and “custom domains”; your running plan carries the marker “Current”.
-
Choose “Select”.
After “Opening…” the secure checkout page appears.
-
Complete the payment.
You then see “Payment successful — your account has been updated.”, or “Checkout cancelled. You were not charged.” if you stop halfway.
The section shows the paid plans; the free scope has no card of its own there. Under “Monthly” the price is followed by “/mo”, under “Yearly” it reads “/yr” and the card names the yearly amount. Arithmetically, the yearly price equals ten monthly prices in every plan. On the checkout page you can also enter a promotion code.
A note below the cards points out that the prices are net and that 19 percent VAT is added for Germany and EU B2C purchases. For an account's first paid subscription XICflow sets up a 14-day trial — it applies once only, and subscribing again later does not bring it back. If you switch plans while a subscription is running, the checkout page is skipped: the change takes effect immediately with prorated billing and the page confirms it with a message such as “Plan updated.”
Billing is reserved for the “Owner” role
Switching plans, buying credits and the payment portal can only be operated by whoever owns the account. Invited members — even with the “Administrator” role — instead get a note that their role does not allow this action. They can still look at usage and invoices.
Credits are the extra balance for actions beyond the monthly quota. The “AI credit packs” section offers “100 KI-Credits”, “500 KI-Credits” and “2000 KI-Credits”, each with a net price and the price per “Credit”. Choose “Buy” and complete the payment; the balance in the “Current plan” card then goes up. Purchased credits do not expire at the end of the month.
They do not last forever, though: a purchased pack expires on 31 December of the third calendar year after the purchase. The balance that expires soonest is always used first — so buying again regularly costs you nothing. The figure shown under “AI credits” is always the sum of all packs that are still valid.
Invoices, payment details and cancellation
The “Invoices” section lists every billing document with number, status, date and amount.
Use “Sort:” to order the list by “Date”, “Amount” or “Status”; clicking again reverses the direction. Select a row to reveal the line items along with “Net”, “VAT” and “Gross”; “PDF” on the right saves the invoice. Before your first billing the list reads “No invoices yet.”
Every row carries its status as a marker: “Issued”, “Paid”, “Overdue”, “Cancelled”, “Refunded”, “Partial refund”. Next to “VAT”, the applied tax rate is shown in brackets. For screen readers the “PDF” button is named “Download invoice as PDF”; the file is named after the invoice number.
While a paid subscription is running, the “Current plan” card carries the button “Manage payment details & cancellation”. In the secure payment portal you change payment method and billing address and, if needed, cancel the subscription.
Tax details and billing address
The checkout page already asks for the billing address, and you can enter a VAT identification number there as well. XICflow takes both over for your invoices and derives the tax rate from them: 19 percent within Germany, 0 percent under the reverse-charge procedure for business customers from another EU country with a valid VAT ID, the standard rate of their country for private customers within the EU, and 0 percent outside the EU. If you change the address or VAT ID later in the payment portal, XICflow adjusts the price of your running subscription for the following billing periods.
A cancellation takes effect at the end of the period
Your plan stays fully usable until the end of the current billing period, after that the free scope applies again. While the period is running you can withdraw a scheduled cancellation in the same portal. During that time the top of the account page reads “Your subscription ends on” with the date, followed by “You can resume it via ‘Manage payment’.”
After it ends your content is kept; the limits of the free scope apply again. So check beforehand how many websites and custom domains you use and how much storage you occupy, and save the data export from the “Privacy” section if needed.
Password and two-factor sign-in
Open “Security & sign-in” from the link on the account page; “Back to account” takes you out again.
Three ways to protect your sign-in
Password
At least ten characters. Changing it signs out every other session.
Two-factor code
An extra code from an authenticator app at every sign-in.
Passkey
Sign in with fingerprint, face or a security key instead of a password.
Below the heading sits the summary “Manage two-factor, passkeys, password and connected accounts.” The cards follow in that same order: “Two-factor authentication (2FA)”, “Passkeys”, “Connected accounts”, “Active sessions” and finally “Change password”. While the details are loading it reads “Loading…”; if an action fails, “An error occurred.” or a more specific message appears above the card in question.
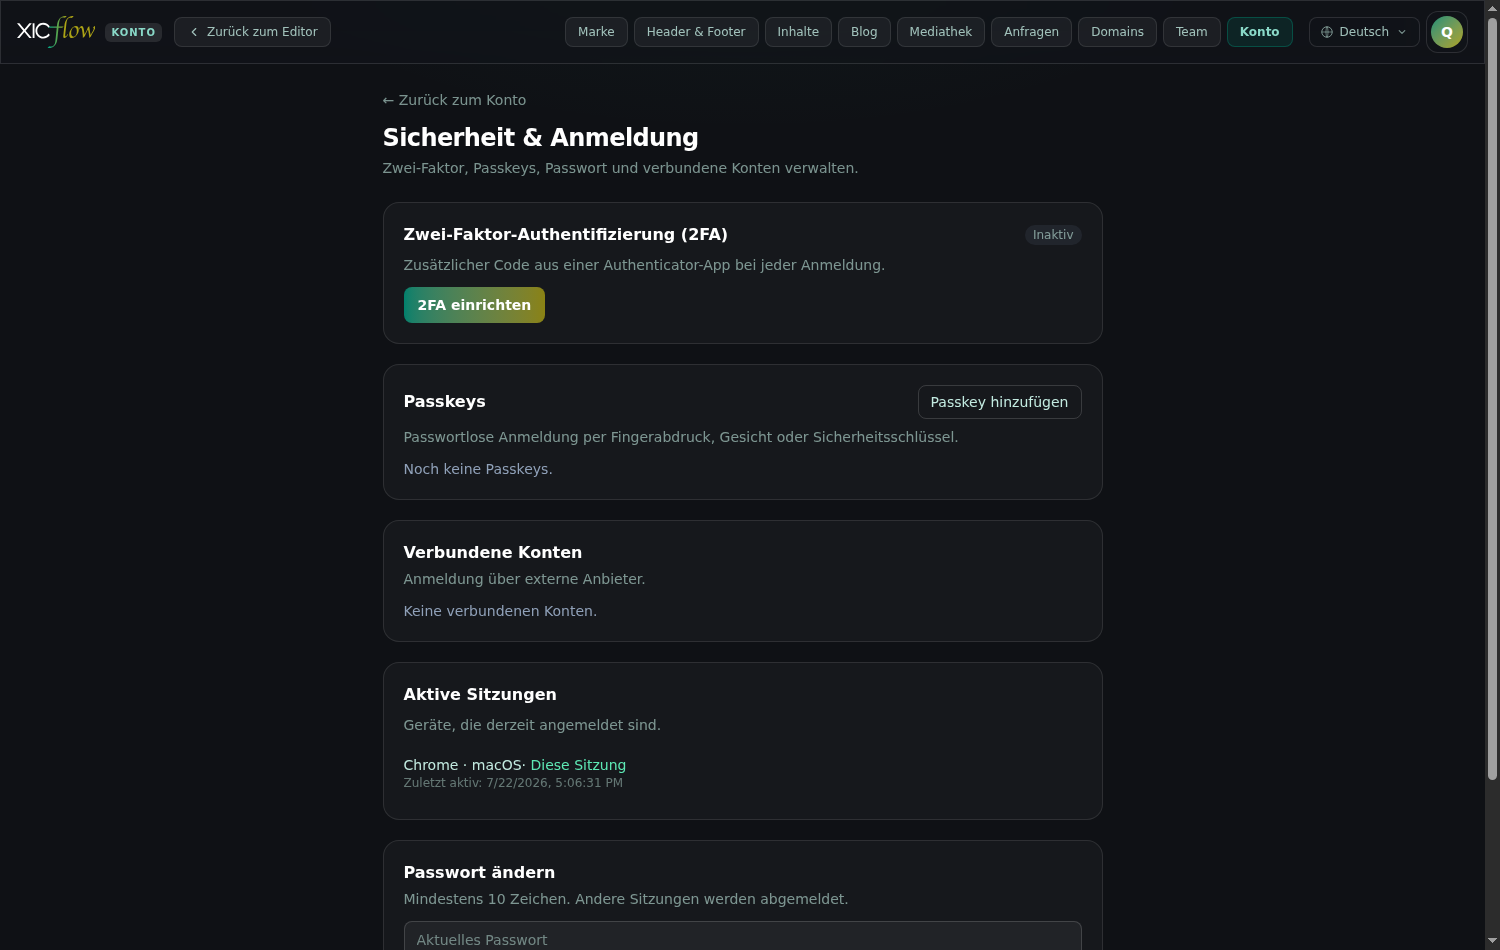
In the “Change password” section fill in “Current password”, “New password (min. 10 characters)” and “Confirm new password”, then choose “Change password”; the page confirms with “Password changed.” The hint “At least 10 characters. Other sessions will be signed out.” belongs to it — on your other devices you sign in again afterwards.
The “Two-factor authentication (2FA)” section shows the state “Active” or “Inactive” on the right. This is how you switch the second step on:
-
Choose “Set up 2FA”.
The section then shows the key and the code field.
-
Use “Open in authenticator app” or type the displayed key into the app manually.
Both lead to the same result; the key helps when the app runs on a different device.
-
Enter the current code under “Enter the 6-digit code from the app”.
The code changes every 30 seconds, so use a fresh one.
-
Choose “Enable”.
The page confirms with “2FA is active.”
-
Save the “Backup codes” right away, for example via “Copy codes”.
Each code works once and replaces the app code whenever your phone is out of reach.
Above the key you find the instruction “Open the link in your authenticator app or enter the key manually:”. XICflow then shows eight backup codes in the format “abcde-12345” together with the note “Keep these safe. Each code works once if you lose access to the app.” They are shown this one time only.
With 2FA active the section shows “Backup codes left:” and the number remaining. You create new ones through the fields “Password” and “2FA or backup code” followed by “Regenerate backup codes”; the previous ones stop working. To switch it off, fill in the same fields and choose “Disable 2FA” — the page then reports “2FA has been disabled.”
After five failed attempts the second step pauses
If a wrong code is entered five times during sign-in, XICflow accepts no further code for around ten minutes — not even a correct one. This protects your account against someone working through the six digits. Simply wait it out; one successful code resets the counter immediately.
Passkeys, connected accounts and sessions
A passkey replaces the password with fingerprint, face recognition or a security key.
-
In the “Passkeys” section choose “Add passkey”.
-
Give it a label under “Name for this passkey”.
A device name makes it easier to tell several passkeys apart later.
-
Confirm the prompt from your device.
Depending on the device that means fingerprint, face recognition or a security key.
The card carries the explanation “Passwordless sign-in with fingerprint, face or a security key.” As long as none is set up it reads “No passkeys yet.” Existing passkeys can be adjusted with “Rename” or removed with “Remove”; before deleting, XICflow asks “Really remove this passkey?”. If your browser cannot handle them, the section reads “This browser does not support passkeys.” and the button for adding one is missing.
Connected accounts
The “Connected accounts” card (“Sign in via external providers.”) lists the sign-in services your account is linked with, each with the address stored there. “Disconnect” releases a link; if there is none, it reads “No connected accounts.” You can only disconnect the last external route if a password is set for your account — otherwise XICflow rejects the action with a note to set a password first. That way nobody locks themselves out.
Active sessions
“Active sessions” (“Devices that are currently signed in.”) lists every open sign-in with an identifier made of browser and operating system — “Chrome · Windows”, for example — and the time under “Last active”. The session you are working in is marked “This session” and has no sign-out button. You sign out individual devices with “Sign out”; “Sign out all others” appears as soon as there is more than one session and ends all the rest at once. If it reads “No active sessions.”, the list could not be retrieved — reload the page.
Data export and common messages
The “Privacy” section carries the note “Download your account and website data as JSON (GDPR Art. 20, data portability).”
Choose “Export my data”; after “Preparing…” the file downloads. The export works well as a backup before you make larger changes or end the subscription. The file name contains the date of the day, for example “xicflow-datenexport-2026-07-22.json”.
It contains:
- Account: name, plan, status, creation date and your billing details.
- People: name, email address and role of every member of the account.
- Websites: pages, collections including entries, and connected domains.
- Form requests with all fields, timestamp and origin.
- Invoices with number, amounts, tax rate and period.
- Media library: file name, format, size, dimensions and alternative text.
Not included are your password, the secrets behind two-factor sign-in and internal payment identifiers — they are not part of the portable data. Published texts and images of your website can additionally be retrieved from the website itself.
Ending the account
XICflow has no button for deleting an account. First end the subscription in the payment portal — it keeps running until the end of the period you paid for — and contact us if the stored data should be removed as well. Download the export beforehand: once the data is deleted it can no longer be produced.
Common messages
- “Account data could not be loaded.” — Reload the page; your data itself is not affected.
- “Online payment is not enabled yet. Please contact us for an upgrade.” — The checkout page could not be opened. Get in touch with us and we will arrange the plan change.
- “The payment portal is currently unavailable.” — Try “Manage payment details & cancellation” again in a few minutes. A cancellation only takes effect once you have confirmed it in the portal.
- The payment went through, but the plan still shows the old value. — Confirmation can take a moment; reload the account page after one or two minutes.
- The code from the authenticator app is rejected. — Such codes depend on the clock: switch on automatic time synchronisation on your phone and enter a fresh code, or use a backup code.
- “Export failed.” — Wait a moment and choose “Export my data” again; with many websites the file takes longer to build.
- Sign-in reports too many failed 2FA attempts. — After five failed attempts the second step pauses for around ten minutes. Wait it out and then use a fresh code.
- Sign-in reports that the account has been suspended. — Signing in is not possible for the time being. Your content stays stored; get in touch with us and we will clarify the reason. A few messages of this kind come straight from the server and appear in German.